


Fix Trailer Lights Roadside in Minutes: Isolate, Ground, Connector
Most trailer light failures trace back to a bad ground, a corroded connector pin, a blown fuse in the tow vehicle, or a failed bulb or LED housing, roughly in that order of likelihood. Plug a circuit tester into the vehicle’s socket, or have someone watch the trailer while you cycle the switches, before you touch a single wire. If the vehicle sends power correctly, start your repair at the trailer’s ground connection and the plug itself.
TL;DR:
- Most trailer light problems stem from ground faults, corroded connectors, blown vehicle fuses, or failed bulbs, with ground issues being most common.
- Using a circuit tester or a helper can quickly identify whether the fault is on the truck or trailer side before disassembling wiring.
- Checking and cleaning ground connections, avoiding reliance on the hitch ball as a ground, and applying dielectric grease prevent recurring failures.
- Replacing damaged housings with weatherproof LED units or magnetic tow lights provides a more permanent fix for faulty lights.
- Carrying basic tools, a trailer circuit tester, spare parts, and a dedicated ground wire in the vehicle reduces roadside repair time and prevents further damage.
Table of Contents
- Quick Symptom Checklist For Diagnosing Trailer Light Problems
- How Do You Tell If The Truck Or The Trailer Is At Fault?
- Why Is Ground The First Thing To Check?
- How Do You Check Connectors For Corrosion Or Loose Pins?
- Bulb Failure Or LED Failure: How To Tell The Difference
- How Do You Trace Wiring Harness Problems And Voltage Loss?
- What Tools Should You Carry For Roadside Light Repairs
- When Should You Stop And Call A Repair Shop?
- What’s The Real Fix Nobody Talks About?
- Replace It Right: Matching The Fix To The Failure
- Where To Learn More About Trailer Light Diagnosis
- Sources
Quick Symptom Checklist For Diagnosing Trailer Light Problems
Before pulling out tools, figure out exactly what’s failing. The pattern tells you where to look.
- All lights out on both sides: points to the connector, a shared ground, or a dead fuse upstream.
- One side only: usually an isolated wire, bulb, or ground fault on that circuit.
- Dim or flickering lights: almost always a ground or voltage drop problem, not a dead bulb.
- Turn signal triggers brake or tail lights (cross-talk): classic sign of a shared bad ground.
Start by confirming the truck’s own lights work first (running lights, turn signals, brake lights), using a helper or a nearby reflective surface. Then reseat the trailer plug fully, inspect it for greenish corrosion or bent pins, and swap in a spare adapter if you carry one. That single swap resolves more roadside failures than people expect.
How Do You Tell If The Truck Or The Trailer Is At Fault?
Isolating the fault before you start disassembling anything saves hours. A dedicated trailer light tester plugged into the vehicle’s socket gives you a definitive answer in under a minute.
- Plug the tester into the tow vehicle’s connector and cycle through running lights, brake, and both turn signals.
- If the tester lights up correctly for every function, the problem sits on the trailer side. Stop testing the truck and move to the trailer’s ground and wiring.
- If the tester shows nothing or partial function, check the vehicle’s fuses before assuming a wiring fault. Some trucks route trailer circuits through a separate high-power distribution center under the hood, completely separate from the interior fuse box.
- If a fuse is blown, replace it once. If it blows again immediately, stop. That’s a short somewhere in the harness, not a fuse problem.
Pro Tip: Keep a cheap 4-way or 7-way test connector in your glove box. It costs less than a tow bill and tells you in seconds whether you’re chasing a truck problem or a trailer problem.
No tester on hand? A helper standing behind the trailer while you work the brake pedal and turn signal stalk does almost the same job, just slower.
Why Is Ground The First Thing To Check?
A weak or broken ground is the single most common cause of trailer light failures, and it produces symptoms that confuse people into replacing perfectly good bulbs. Ground failure explains most cross-talk, dimming, and flickering complaints that owners initially blame on the bulbs themselves.
Test it with a multimeter set to resistance (ohms), one probe on the light housing’s ground wire and the other on bare frame metal. A clean ground should have very low resistance, indicating good metal-to-metal contact. Anything noticeably higher means corrosion, paint, or grease is blocking the connection.
To fix it for good:
- Sand the ground point down to bare, shiny metal, not just the visible surface rust.
- Use stainless steel fasteners so corrosion doesn’t creep back in within a season.
- Run a dedicated ground wire directly to each light housing instead of relying on the frame or hitch ball to carry current.
- Coat the finished connection in dielectric grease to seal out moisture.
Relying on the hitch ball as your ground path is a known weak point. Paint, grease, and rust routinely block that connection on boat and utility trailers, which is why a dedicated ground lead is worth the extra ten minutes of wiring on any trailer more than a few years old.
How Do You Check Connectors For Corrosion Or Loose Pins?
The plug between your truck and trailer takes more physical abuse than any other part of the circuit. It flexes, vibrates, gets rained on, and sits exposed to road salt, so treat it as your first physical suspect once you’ve confirmed the vehicle side works.
- With the lights on, gently wiggle the harness near the plug. A flicker means intermittent contact somewhere in that connection.
- Clean each pin with electrical contact cleaner and a brass wire brush, never steel wool, which can scratch and worsen corrosion.
- Check for a set screw inside round pin-style connectors. These loosen over time and cause exactly this kind of failure.
- Coat cleaned pins in dielectric grease before reconnecting.
- Rule out adapters by swapping in a known-good spare adapter if you use one between a 4-pin and 7-pin setup.
Bulb Failure Or LED Failure: How To Tell The Difference
Incandescent bulbs and sealed LED units fail differently, and mixing up the fix wastes time.
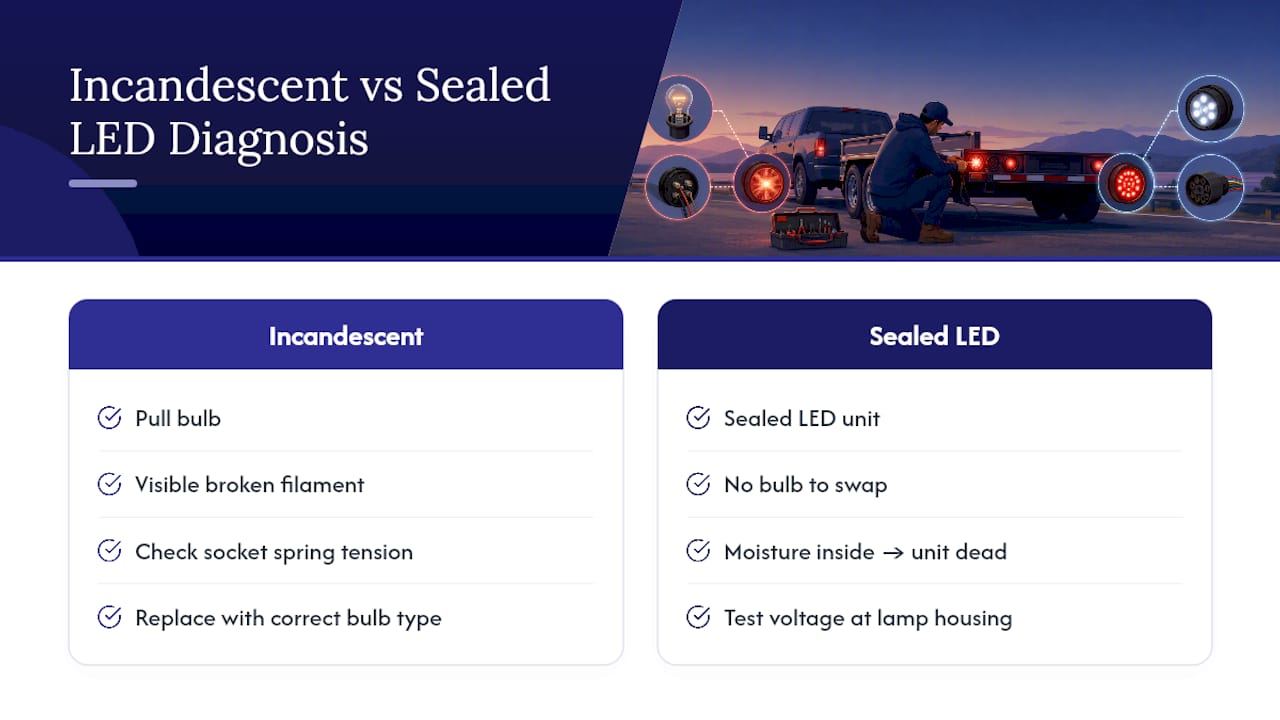
For incandescent bulbs, pull the bulb and check the filament for a visible break, then check that the socket has enough spring tension to hold contact. Replace with the correct bulb type for that housing.
For sealed LED units, there’s no bulb to swap. Moisture inside a sealed LED housing usually means the whole unit is done, since the seal that failed can’t be restored once water gets past it. Before condemning the light, test voltage right at the lamp housing. If voltage isn’t reaching the lamp at all, the fault is upstream, not in the light itself.
How Do You Trace Wiring Harness Problems And Voltage Loss?
Work backward from the plug toward the lights, checking every junction box and splice along the way, especially near suspension components and ramps where wires chafe against moving parts.
- Inspect the harness at each connection point for cracked insulation, green corrosion, or wires pinched by moving hardware.
- Measure voltage at the lamp itself while the circuit is active and under load, since an unloaded reading can look fine while the loaded circuit drops out.
- A drop of more than 10 to 15% between source voltage and lamp voltage points to resistance somewhere in that run.
- Repair damaged sections with waterproof heat-shrink butt connectors and proper strain relief. Electrical tape alone will fail again within a season.
What Tools Should You Carry For Roadside Light Repairs
A small kit handles most fixes without a trip to the shop:
- Multimeter or 12V test light: confirms power and ground at any point in the circuit.
- Dedicated trailer circuit tester: the fastest way to isolate vehicle versus trailer.
- Contact cleaner and dielectric grease: clears corrosion and seals connections against moisture.
- Spare bulbs, fuses, and heat-shrink butt connectors: covers the most common quick fixes.
- Basic hand tools and a spare adapter plug: rounds out what you need on the road.
Pro Tip: A 26 LED magnetic trailer light kit belongs in that kit too. It gets you legal and visible in minutes if a housing fails somewhere you can’t repair on the spot.
When Should You Stop And Call A Repair Shop?
Some symptoms aren’t roadside jobs. Repeatedly blown fuses after a fresh replacement mean a short is hiding somewhere in the harness, and chasing it with more fuses just wastes money. Hidden harness damage inside the frame rails, a moisture-contaminated junction box, or an intermittent fault you can’t reproduce on demand all call for a shop with proper diagnostic equipment.
Never tow after dark, or in traffic, with a nonworking brake light or turn signal. If you can’t resolve the fault on the spot, secure the load and arrange a tow to a service center instead of risking the drive.
What’s The Real Fix Nobody Talks About?
Most trailer light complaints get treated as a parts problem when they’re really a maintenance problem. Owners replace bulbs, sockets, even entire light assemblies, without ever touching the ground wire that caused the failure in the first place. That’s backward. Fix the ground and the connector, and half of these “mystery” failures stop recurring altogether.
A brief check before every tow, lights on, walk around, look for anything dim or dark, catches problems while they’re still a five-minute fix instead of a roadside repair in the rain. Pair that habit with a small kit in the truck and you’ll rarely get stranded by lighting.
Some lighting manufacturers build their products to DOT FMVSS 108 standards with sealed, weatherproof housings specifically because moisture and vibration are what kill trailer lights in the real world, not age. A magnetic kit can help you get home safely today. A sealed LED replacement helps prevent the same failure from happening again next season.
— All
Replace It Right: Matching The Fix To The Failure
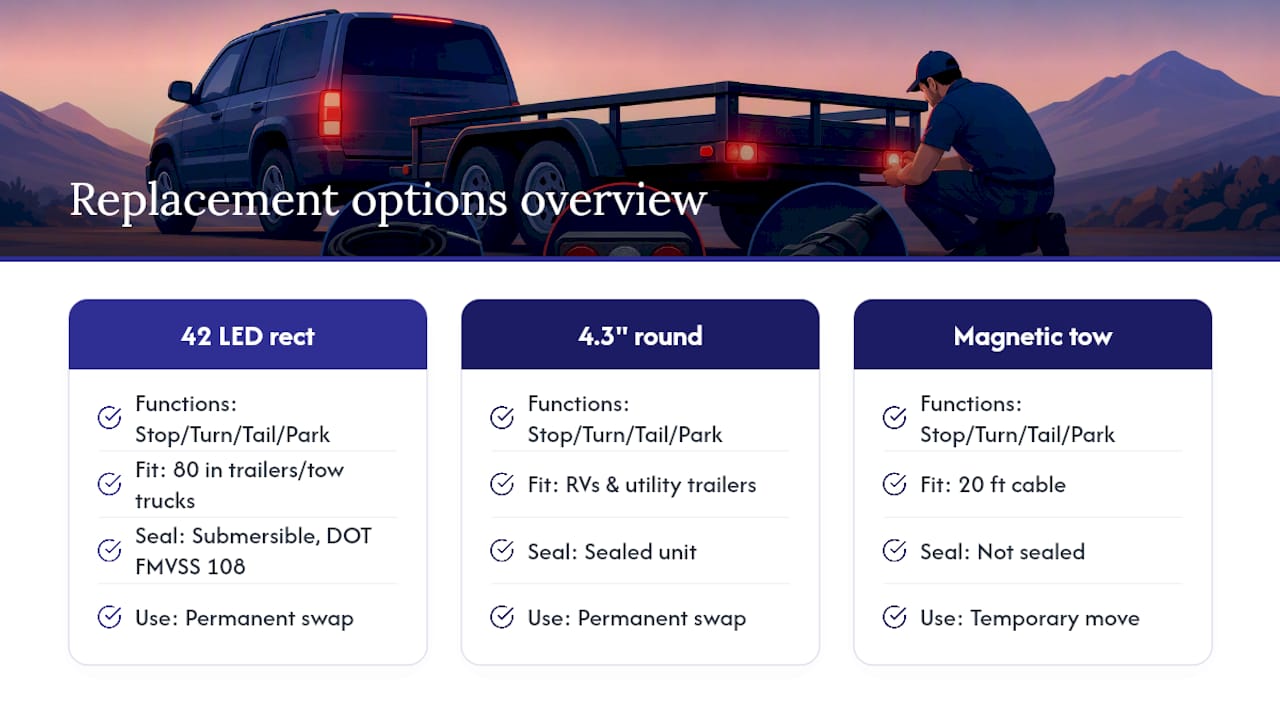
If you’ve traced the fault back to a housing that’s cracked, fogged, or simply dead inside, this is where the fix gets permanent instead of temporary. 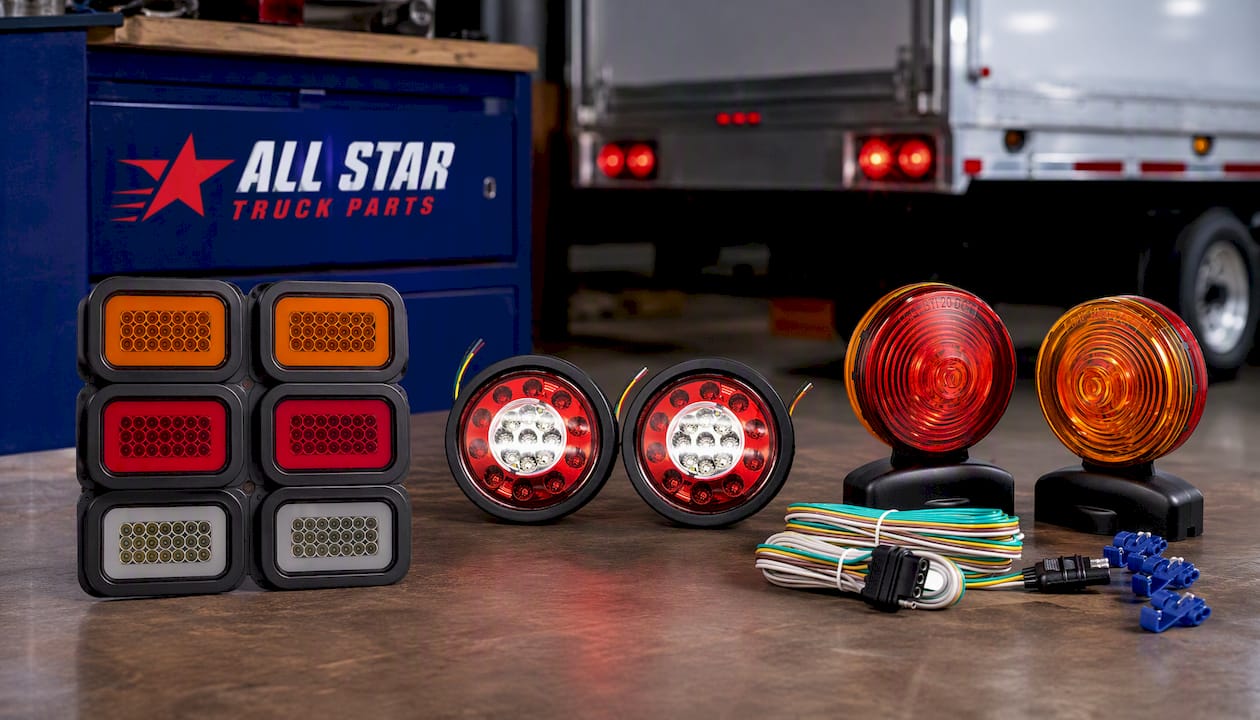 For a full permanent swap on a wide trailer, the 42 LED rectangle tail light kit covers stop, turn, tail, and park functions in one submersible, DOT FMVSS 108 compliant housing built for 80 inch wide trailers and tow trucks. If your housing is the smaller round style common on RVs and utility trailers, the 4.3 inch round LED tail light grommet-mounts in place of a failed sealed unit without cutting new holes in the panel.
For the moment you just need to get moving, the magnetic tow light kit holds with 55 pounds of magnet strength across a 20 foot cable, enough to survive highway speeds until you can install a permanent fix.
Before you buy any replacement, check three things: DOT FMVSS 108 compliance, a submersible or IP-rated seal if the housing sits low near splash zones, and the plug type that actually matches your harness. Grommet mount fits a cutout in sheet metal; surface mount bolts onto a flat bracket. Getting that detail wrong means a second order and a second install.
Where To Learn More About Trailer Light Diagnosis
These guides go deeper into specific diagnostic steps referenced above:
- Big Rentals’ troubleshooting guide walks through the pre-tow check habit and common failure points step by step.
- Semi Trailer News’ electrical fault guide breaks down voltage drop testing and sealed LED failure in more technical detail.
- Centreville Trailer Parts’ diagnostic guide lays out the ground to connector to harness to lamp diagnostic order referenced throughout this article.
Sources
- Why Are My Trailer Lights Not Working? A Troubleshooting Guide | Big Rentals
- How to Diagnose Electrical Faults in Trailer Lighting Circuits | Semi Trailer News
- How to diagnose & fix your trailer lights - Centreville Trailer Parts
Recommended
- 20X 3 Wire Plug Truck Trailer Light Plug Molded 3 Prong Pigtail Harness Connector for Stop Turn Tail Reverse Brake Backup
- 26 LED Magnetic Trailer Light Kit 2PCS LED Trailer Light Universal Running Brake Turn License Light
- 2 Prong Pigtail Wire Plug PL-10 and 2" Rubber Grommet for Truck Trailer Side Marker Clearance Lights
- Stud Mounted 15 LED Trailer Towing Light Set Red/Amber Stop Turn Tail White License Plate
Related Lighting & Accessories


- $ 26.50
$ 49.95- $ 26.50 Save $ 23.45
- Unit price
- per


- $ 34.50
$ 59.95- $ 34.50 Save $ 25.45
- Unit price
- per


- $ 29.95
$ 49.95- $ 29.95 Save $ 20.00
- Unit price
- per
